OpenVPNの構築(ブリッジモード)

1.はじめに

モバイル環境も良くなると、外出先から自宅内のネットワークに接続したくなることがある。
昔は会社だと会社に設置したアナログモデムへ電話して社内ネットワークに接続するなんて方法もあったが、VPN接続をすることで安全に外からローカルネットワークの接続が可能となった。
そんな中でIPsecやL2TPなどいろいろあるが、今回はその中でも良いと思われる扱いやすいOpenVPNを導入してみた。

2.ルーティングモードとブリッジモード

OpenVPNにはルーティングモードとブリッジモードがあります。
今度はやりたかったブリッジモードを構築してみます。
全体的な構成はこんな感じ

携帯電話キャリアのインターネット接続は比較的ローカルIPが多い。
会社によってIPアドレスは違うが、自宅と同じIPにならないよう注意が必要。
この場合、キャリアからもらうIPアドレスは192.168.43.**として自宅内を192.168.0.0/24とする。
外出先のクライアントPCからは192.168.0.3→192.168.0.2→自宅内へと言うルートになる。
ブリッジモードの場合、外出先のクライアントPCが使用するOpenVPNのアドレスも192.168.0.0/24の中になり、全てのプロトコルが使用できることになる。

3.インストール

いつものようにportからインストールします。
cd /usr/ports/security/openvpn
make install clean

次に設定ファイルがデフォルトで置かれないのでコピーします。
mkdir /usr/local/etc/openvpn
cp /usr/local/share/examples/openvpn/sample-config-files/server.conf /usr/local/etc/openvpn/openvpn.conf
これでインストールは終了

4.鍵・証明書関係の作成

鍵と証明書を作成しますが、まずはデフォルトですと有効期限が短いと感じる人もいるので、最初に有効期限を設定します。
●pki環境の作成
# cd /usr/local/share/easy-rsa
# easyrsa init-pki
WARNING!!!
You are about to remove the EASYRSA_PKI at:
* /usr/local/share/easy-rsa/pki
and initialize a fresh PKI here.
Type the word 'yes' to continue, or any other input to abort.
Confirm removal:yes
* Notice:
Aborting without confirmation.
#

●有効期限の設定
/usr/local/share/easy-rsa/pki/vars
set_var EASYRSA_CA_EXPIRE 3650 #CAの期限、デフォルトは10年
set_var EASYRSA_CERT_EXPIRE 825 #証明書の期限、デフォルトは2年3カ月くらい
set_var EASYRSA_CRL_DAYS 180 #失効期限
set_var EASYRSA_CERT_RENEW 30 #期限の何日前から証明書を更新できるか
好きな長さに変更します。

●CAの鍵と証明書の作成
# easyrsa build-ca
* Notice:
Using Easy-RSA configuration from: /usr/local/share/easy-rsa/pki/vars
* Notice:
Using SSL: openssl OpenSSL 1.1.1k-freebsd 24 Aug 2021
Enter New CA Key Passphrase:パスワード
Re-Enter New CA Key Passphrase:パスワード
........................+++++
............+++++
You are about to be asked to enter information that will be incorporated
into your certificate request.
What you are about to enter is what is called a Distinguished Name or a DN.
There are quite a few fields but you can leave some blank
For some fields there will be a default value,
If you enter '.', the field will be left blank.
-----
Common Name (eg: your user, host, or server name) [Easy-RSA CA]:hogehoge.mydns.jp

* Notice:

CA creation complete and you may now import and sign cert requests.
Your new CA certificate file for publishing is at:
/usr/local/share/easy-rsa/pki/ca.crt

#
pki/private/ca.key と pki/ca.crt ができる。

●サーバの鍵と証明書の作成
# easyrsa build-server-full server nopass
* Notice:
Using Easy-RSA configuration from: /usr/local/share/easy-rsa/pki/vars

* Notice:
Using SSL: openssl OpenSSL 1.1.1k-freebsd 24 Aug 2021

Generating a RSA private key
........................+++++
..+++++
writing new private key to '/usr/local/share/easy-rsa/pki/ebbb2044/temp.c8d9d5c7'
-----
* Notice:

Keypair and certificate request completed. Your files are:
req: /usr/local/share/easy-rsa/pki/reqs/server.req
key: /usr/local/share/easy-rsa/pki/private/server.key

Using configuration from /usr/local/share/easy-rsa/pki/ebbb2044/temp.f0696a26
Enter pass phrase for /usr/local/share/easy-rsa/pki/private/ca.key:パスワード
Check that the request matches the signature
Signature ok
The Subject's Distinguished Name is as follows
commonName :ASN.1 12:'server'
Certificate is to be certified until Mar 16 11:02:09 2026 GMT (825 days)

Write out database with 1 new entries
Data Base Updated

* Notice:
Certificate created at: /usr/local/share/easy-rsa/pki/issued/server.crt

#
pki/private/server.key と、pki/reqs/server.req、pki/issued/server.crt ができる。

●dhの作成
# easyrsa gen-dh
* Notice:
Using Easy-RSA configuration from: /usr/local/share/easy-rsa/pki/vars

* Notice:
Using SSL: openssl OpenSSL 1.1.1k-freebsd 24 Aug 2021

Generating DH parameters, 2048 bit long safe prime, generator 2
This is going to take a long time
...............................
* Notice:

DH parameters of size 2048 created at /usr/local/share/easy-rsa/pki/dh.pem

#
pki/dh.pemができる。

●失効リストの作成
# easyrsa gen-crl
miyakoshi:# easyrsa gen-crl
* Notice:
Using Easy-RSA configuration from: /usr/local/share/easy-rsa/pki/vars

* Notice:
Using SSL: openssl OpenSSL 1.1.1k-freebsd 24 Aug 2021

Using configuration from /usr/local/share/easy-rsa/pki/1b1b795c/temp.846d448f
Enter pass phrase for /usr/local/share/easy-rsa/pki/private/ca.key:パスワード

* Notice:

An updated CRL has been created.
CRL file: /usr/local/share/easy-rsa/pki/crl.pem

#
pki/crl.pem ができる

●クライアント用の鍵と証明書の作成
# easyrsa build-client-full client
Note: using Easy-RSA configuration from: /usr/local/share/easy-rsa/vars
Using SSL: openssl OpenSSL 1.1.1k-freebsd 25 Mar 2021
Generating a RSA private key
............................................................................................................+++++
.......+++++
writing new private key to '/usr/local/share/easy-rsa/pki/easy-rsa-26415.jk7wgS/tmp.q5DnbQ'
Enter PEM pass phrase:パスワード
Verifying - Enter PEM pass phrase:パスワード
-----
Using configuration from /usr/local/share/easy-rsa/pki/easy-rsa-26415.jk7wgS/tmp.nIitwB
Enter pass phrase for /usr/local/share/easy-rsa/pki/private/ca.key:パスワード
Check that the request matches the signature
Signature ok
The Subject's Distinguished Name is as follows
commonName :ASN.1 12:'false'
Certificate is to be certified until Nov 24 10:16:50 2023 GMT (825 days)
Write out database with 1 new entries
Data Base Updated
pki/issued/client.crt, pki/private/false.key, pki/reqs/client.req ができる
接続するクライアントを同時に複数接続できるようにするには、このクライアント用の名前を変えて複数作成します。

証明書関係をコピー
# cp /usr/local/share/easy-rsa/pki/ca.crt /usr/local/share/easy-rsa/pki/issued/server.crt /usr/local/share/easy-rsa/pki/private/server.key /usr/local/share/easy-rsa/pki/dh.pem /usr/local/share/easy-rsa/pki/crl.pem /usr/local/etc/openvpn/
# cp /usr/local/share/easy-rsa/pki/private/client.key /usr/local/share/easy-rsa/pki/issued/client.crt /usr/local/etc/openvpn/client/

●tlsキー生成
# openvpn --genkey secret /usr/local/etc/openvpn/ta.key
以上でファイル作成は終了。

5.サーバーの設定・起動

まず必要なデバイスがあるのでロードする。
# kldload if_tap
# kldload if_bridge
既にロードされていると出る場合もありますが、ロードされていなかったものがあれば起動時にロードされるように
/boot/loader.conf へ追記
if_bridge_load="YES"
if_tap_load="YES"
次に
/usr/local/etc/openvpn/openvpn.conf を編集
# ポート設定
port 1194
# tcpよりudpのほうが早い
proto udp
# ブリッジの場合はtap、ルーティングはtun、tun0は既にWAN側で使用しているので1
dev tap0
# Root CAの証明書
ca ca.crt
# サーバのフルチェーン証明書
cert server.crt
# サーバの秘密鍵
key server.key
# dh2048の設定
dh dh.pem
# キーの設定
tls-auth ta.key 0 # This file is secret
# 古いクライアントのサポート不要なので、ワーニングも出る
topology subnet
# VPNのIP設定
# ブリッジモードの場合はserverではなくserver-bridgeを使用する。
# 192.168.0.2はbridge0のIPアドレス、255.255.255.0はサブネットマスク
# 192.168.0.3と192.168.0.9はクライアントに割り当てるIPアドレスで、宅内と重ならないようにすること。
server-bridge 192.168.0.2 255.255.255.0 192.168.0.3 192.168.0.9
# ブリッジモードの場合は設定するとうまく動いたので入れておく
push "dhcp-option DNS 192.168.0.1"
# クライアント同士の接続を許可
client-to-client
#必須
push "redirect-gateway def1" #これを入れるとすべてがVPN経由になる
#ユーザー設定
user nobody
group nobody
keepalive 30 120
# 暗号化方法(ここはちょっと怪しい)
cipher AES-256-GCM
# 圧縮
comp-lzo
persist-key
persist-tun
verb 3
script-security 2
explicit-exit-notify 1
# ログ
status /var/log/openvpn-status.log
log /var/log/openvpn.log
log-append /var/log/openvpn.log

/etc/rc.conf へ追記
openvpn_enable="YES"
openvpn_configfile="/usr/local/etc/openvpn/openvpn.conf"

スタートする前にifconfigでtapとbridgeのインターフェースを作成するためにスクリプトを作成実行する。
/usr/local/etc/openvpn/bridge-up.sh
#!/bin/sh
PATH=/usr/bin:/bin:/usr/sbin:/sbin

if [ "tap0" = "" ]; then
  echo "usage: `basename $0` tap_interface_name"
  exit 1
fi

ifconfig tap0 create
ifconfig tap0 inet 0.0.0.0 up
ifconfig bridge0 create
ifconfig bridge0 addm em0 addm tap0 up
ifconfig bridge0 inet 192.168.0.2 netmask 255.255.255.0
192.168.0.2は先ほど説明したbridgeのIP番号

先に終了時に開放するスクリプトも作成しておく
/usr/local/etc/openvpn/bridge-down.sh
#!/bin/sh
PATH=/usr/bin:/bin:/usr/sbin:/sbin

ifconfig bridge0 destroy
ifconfig tap0 destroy

これで
/usr/local/etc/openvpn/bridge-up.sh
を実行しtap0とbridge0を動かして、動いているか確認する。

$ ifconfig
・・・中略
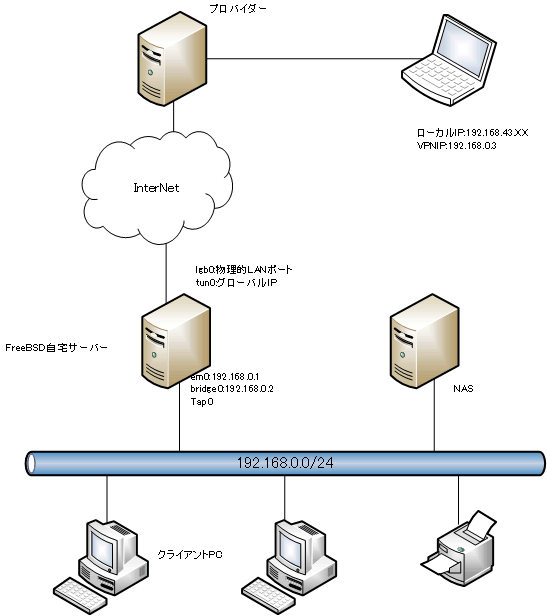
tap0: flags=8943<UP,BROADCAST,RUNNING,PROMISC,SIMPLEX,MULTICAST> metric 0 mtu 1500
        options=80000<LINKSTATE>
        ether **:**:**:**:**:**
        inet 0.0.0.0 netmask 0xff000000 broadcast 0.255.255.255
        groups: tap
        media: Ethernet autoselect
        status: no carrier
        nd6 options=29<PERFORMNUD,IFDISABLED,AUTO_LINKLOCAL>
bridge0: flags=8843<UP,BROADCAST,RUNNING,SIMPLEX,MULTICAST> metric 0 mtu 1500
        ether **:**:**:**:**:**
        inet 192.168.0.2 netmask 0xffffff00 broadcast 192.168.0.255
        id 00:00:00:00:00:00 priority 32768 hellotime 2 fwddelay 15
        maxage 20 holdcnt 6 proto rstp maxaddr 2000 timeout 1200
        root id 00:00:00:00:00:00 priority 32768 ifcost 0 port 0
        member: tap0 flags=143<LEARNING,DISCOVER,AUTOEDGE,AUTOPTP>
                ifmaxaddr 0 port 5 priority 128 path cost 2000000
        member: em0 flags=143<LEARNING,DISCOVER,AUTOEDGE,AUTOPTP>
                ifmaxaddr 0 port 2 priority 128 path cost 20000
        groups: bridge
        nd6 options=9<PERFORMNUD,IFDISABLED>
$
tao0がUPになっていること、bridge0に割り当てているはずの192.168.0.2が割り当てられていることを確認します。

手動スタート
# /usr/local/etc/rc.d/openvpn start

これで外からも自宅内と全く同じ環境でのアクセスが可能になる。
ルーティングモードと違いブリッジなのでsambaの名前解決なども通るようになり、完璧に自宅内のLANへ接続したのと同じ環境になる。

6.クライアントPCの設定・接続

クライアントPCはWindowsでの場合、サイトへ行きまずはダウンロード。
https://www.openvpn.jp/
右にWindowsのインストーラがあるので、必要なものをダウンロードしインストールする。

サーバー側でコピーするファイルを集約する。
# mkdir /usr/local/etc/openvpn/client
# cd /usr/local/etc/openvpn/client
# cp /usr/local/share/examples/openvpn/sample-config-files/client.conf wizard-limit.ovpn
# cp ../ca.crt ../ta.key /usr/local/share/easy-rsa/pki/issued/false.crt /usr/local/share/easy-rsa/pki/private/false.key /usr/local/etc/openvpn/client
これで /usr/local/etc/openvpn/client にまとまる。
wizard-limit.ovpnは内容を編集。
client
dev tap0
proto udp
pull
float
remote 接続先サーバーアドレス 1194
resolv-retry infinite
nobind
persist-key
persist-tun
ca ca.crt
cert false.crt
key false.key
;remote-cert-tls server
tls-auth ta.key 1
cipher AES-256-GCM
comp-lzo
verb 3
;mute 20
redirect-gateway def1l
そして /usr/local/etc/openvpn/client にまとまったファイルを、クライアントPCの
C:\ユーザー\ユーザー名\openvpn\config
の中へ安全な方法でコピーする。
起動後、接続方法は右下のopenvpnアイコンを右クリックして接続を選べば
問題ない場合接続できます。

うまく接続できた場合は、Windowsのコマンドプロンプトを出してipfonfig /allで確認する。
不明なアダプター OpenVPN TAP-Windows6:

   接続固有の DNS サフィックス . . . . .: 
   説明. . . . . . . . . . . . . . . . .: TAP-Windows Adapter V9
   物理アドレス. . . . . . . . . . . . .: XX-XX-XX-XX-XX-XX
   DHCP 有効 . . . . . . . . . . . . . .: はい
   自動構成有効. . . . . . . . . . . . .: はい
   IPv4 アドレス . . . . . . . . . . . .: 192.168.0.3(優先) 
   サブネット マスク . . . . . . . . . .: 255.255.255.0
   リース取得. . . . . . . . . . . . . .: 2021年9月12日 19:07:21
   リースの有効期限. . . . . . . . . . .: 2022年9月12日 19:07:21
   デフォルト ゲートウェイ . . . . . . .: 
   DHCP サーバー . . . . . . . . . . . .: 192.168.0.1
   DNS サーバー. . . . . . . . . . . . .: 192.168.0.1
   NetBIOS over TCP/IP . . . . . . . . .: 有効
とこんな感じでIPアドレスが割り当てられるはずである。

7.スマホからのアクセス

ここまでやっておきながら、スマホのopenvpnで接続しようとしたら接続できない。
Windowsからは問題なくアクセスできるのに…
と思って調べてみたら、スマホからはブリッジモードをサポートしていないようだ。
Androidはrootを取れば可能だとの噂だが、そこまではしたくない。
仕方なく自分は諦めてルーティングモードに戻すことになった。
ブリッジモードが使えれば宅内のビデオデッキがオンラインで再生できるのだが…